Thursday, October 31, 2019

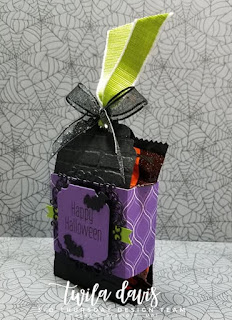
3D Thursday Blog Hop - Spooky Fun Treat Holder

Good morning! and Happy Halloween!  Oh, have we got a fun treat for you today.  Because there are five Thursdays this month, it's time for a Blog Hop featuring our four team members.  If you are following the "Hop" in order then you have just arrived from the ever so crafty Sarah Wills' Blog.  Each of us has come up with a super fun little 3D Halloween Treat.  FREE easy directions are found in our blog post today.  So be sure and hop around to all four!
Spooky Fun Treat Holder


Supplies:

Stamp Set:
To Every Season

Cardstock: 
Basic Black: (1)  8 1/2" x 2" and a scrap
Gorgeous Grape: scrap
Granny Apple Green: (1) 2 1/2" x 1/4"

Designer Series Paper:(DSP)
Brights Collection  Gorgeous Grape (1) 6" x 1 3/4", (1) 2" x 1 3/4"

Tools: Big Shot, Brick and Mortar 3D Emboss Folder, Ornate Frames Stampin' Cut & Emboss (Holiday Catalog), Punches: Classic Label, Delightful Tag Topper, Every Season Punch Pack (Bat),  Memento Black Ink, Adhesive, Dimensionals

Accessories:  1/2" Textured Weave Ribbon Granny Apple Green (6"), 3/8" Glittered Organdy Ribbon Black (10"), Candy (I used two Reese Pumpkins)


Quick & Easy Directions:

1.  Score the 8 1/2" x 2" piece of basic Black CS at 3 3/4" and 4 3/4".  Punch both ends using the  Delightful Tag Topper Punch.  Run each end through the Big Shot using the Brick Emboss Folder.  No need to emboss the (middle) section as it will be the bottom.  Fold the sides up.

2.  Score the 6" piece DSP at 1", 2", 4"and 5".  Putting adhesive on both of the 1" ends and the 2" piece attach it to the Black piece about 1/2" up from the bottom.  Add adhesive to the smaller piece of DSP and attach it over the back pieces the may have a gap showing.

3.  Using the Big Shot and Ornate Frames cut out the one shown above in Black and the other in Gorgeous Grape.  Stamp "Happy Halloween" using Memento Black on the Grape piece.  Attach the piece with saying to the black ornate frame with Dimensionals.

4.  Punch both ends of the 1/4" strip of Granny Apple Green with the Classic Label Punch as shown in the picture below. 

5.  Adhere the Green strip to the back of the black ornate piece in the middle.  Then using adhesive attach this to your treat holder.  Using scrap of Black punch out 2 bats and adhere them to the front of your treat holder as shown.  Add your treats at this time.

6.  Thread the piece of Granny Apple Green Ribbon through the holes at the top of Treat Holder halfway.  Tie the Glittered Black Ribbon around the Granny Apple Green Ribbon into a bow.  Your Spooky Fun Treat Holder is finished!

A few more pictures:

I hope you've enjoyed my fun little Halloween Project.  Now it's time for you to "Hop" on over to   Nicolle Belesimo's Blog and see what "Spooky Fun" she has come up with.  Just click on the button to go to her blog now.  
Happy Halloween!

Nicolle's Blog


Wednesday, October 23, 2019

Stampin' Up! 24 Hour Stamp Sale!

The 24 Hour Stamp Sale is happening now - don't miss out!

Hello Stampin' Friends!

Stampin' Up! very rarely puts stamp sets on sale and for just 24 hours you have the chance to get over 50 popular stamp sets at 15% off!

Check some stamps off your list or get a head start on your holiday gift lists and save - on October 23rd only!

Click below to find which stamps are on sale and place your order before time slips by on this Flash Sale!

When you place your order today be sure and add the Host Code for October JV4P9GMU to receive a FREE package of clear rhinestones from me if you place your order with code by 10pm tonight.


Happy Stampin'
Twila

Order from my website by clicking on the shopping button to the left of my page.
October Host Code JV4P9GMU.

Thursday, October 17, 2019

3D Thursday - Frankenstein Mini Pizza Box

Hello!  This week it was my turn to be the creative member on duty.  I almost squealed with excitement because Halloween Treats are some of my favorite things to make!  For my project I came up with a fun little Frankenstein Treat Box using our Mini Pizza Boxes.  Remember there is a link to download the FREE directions at the end of my blog post, so be sure and do that!
The color choice for my little Frankenstein box was of course Granny Apple Green.  It just happens to be one of my favorite happy colors.  So bright and it almost seems to glow.  I sponged the edges of all my green pieces to give him more depth also.
Here's a side view so you can see his ears and bolts in his neck.  By adding Dimensionals to my project also gave it more of a 3D look.
I think the funnest part to my project is that his hair is the belly band for the box.  That part was actually the "light bulb" moment for me and that's when I knew this was my project for this week.
The inside of the box has a simple Happy Halloween stamped and punched out using the Tailored Label Punch and adhered to the inside lid of the box.  I attached a couple of fun little bats also. The box is a perfect size for a Halloween Treat!  I hope you have enjoyed my little Pizza Box project this week.  Are you ready to get crafty?  For full directions with a list of supplies and pictures, just click on the link below to download the FREE Printable Direction Sheet.  We love sharing our creativity with others!
Have a super crafty day!  Thanks for stopping by!


Guest Designers Wanted!
Our team is now posting every other week and we would like to include Guest Designers on the off weeks. Do you love to create 3D projects? The only rules are current Stampin' Up! products only and a Project Sheet to go with your project. Are you interested in joining us as a Guest Designer for one week? Contact us by private message!


Thursday, October 3, 2019

3D Thursday Is Here with a Cute Halloween Peeps Holder!

Welcome to a new 3D Thursday Project week.  This week my friend and teammate Sarah Wills is our designer this week.  You can find more of Sarah's craftiness over at Sarah's Inkspot so be sure and check it out!  Sarah has created a fun little Halloween Peeps Holder for us. Yes, you heard me right, Halloween Peeps!   Eeeekkk!  I LOVE it!  FREE directions can be found at the bottom of the post!
Pretty darn cute aren't they!  Frankenstein is even peeking out of a little window on the front of the box.  Each box of peeps slides out when you pull on the little ribbon.
The peeps are so cute!  and the packaging is adorable!
Sarah did such a great job on both of these cute treat boxes.
For project info and details please click on the link below and order everything you need to make this super cute project.
Have a crafty day!