Saturday, December 28, 2019

Little Ladybug Stamp Set - FREE during Salebration

I've been playing around with some new stamps from the upcoming Occasions and Salebration Books today.  Just finished this Ladybug card.  What a FUN set.  I love to color with our Blends and this set is perfect just for that.  The set is actually a FREE set for a Host who's party is $300 or more on top of the other great rewards.  I'd love to help you earn this set so message me and we can chat about it.
Have a crafty day!
Twila

Thursday, December 26, 2019

3D Thursday - Easy Hand Sanitizer Holder

I hope you all had a very Merry Christmas.  Yesterday's temps were in the mid 60's here in Southern Illinois which is kinda unusual for us.  It was a beautiful day!  This week's project was crafted up by me.  And since it has been a crazy week I went for something quick and easy.
 A simply hand sanitizer holder which I crafted up using some of the beautiful new DSP called Peaceful Poppies from the new Occasions Catalog that goes live January 3rd.
This simply little holder just uses a 2" x 8 1/2" strip of Basic Black and a 1 3/4" x 6 1/2" strip of DSP.
The stamp set I used for my sentiment piece is called Label Me Pretty.  I made several of these little holders using some of our Christmas DSP and they turned out super cute as well.  Ok so are you ready to craft some of these quick and easy holders up?  Just click on the link below to print off FREE directions!  Have a crafty day!


Thursday, December 19, 2019

3D Thursday - Guest Designer

Greetings! and welcome to this week's FREE 3D Thursday post.  This week our guest designer is Rick Adkins!  Rick has created a great guy gift box with matching tag using some products from our new Occasions mini.  You can find more of Rick's craftiness on his blog.
Let's check out his project.
Rick used the new stamp set and die bundle "Club House" for his project.  He made a gift box and matching tag.
Rick used the new DSP named Country Club to add some great color to his gift box.  And what a fun tag with all the wonderful different colored twines.  When done the box measures 7" x 2".  So I'm thinking what a great little box for a group of 3 gold balls!  Great for a Christmas, Birthday or Father's Day present.  I'll have to make one and try it out.  Are you ready to make one of these great boxes?  Just click on the link below to print off the FREE directions to this project.  Enjoy and have a crafty day!


Thursday, December 12, 2019

3D Thursday - Holiday Treat Bag

Hey Stampers!  Welcome to another FREE 3D Thursday project!  It was teammate Sarah Wills turn in the craft room this week.  Sarah came up with a super cute Treat Bag that holds a Starbucks Sachet.  It's quick and easy!  and I LOVE it!
Let's check it out!
 Sarah created her project by using Copper Dotted Treat Bag from SU along with the "Cup Of Christmas" stamps and Dies and also Seasonal Layers Dies.
Here's what it looks like loaded up with all the goodies!  It's such a fun project.  The envelope is folded in half to make 2 pockets, one for the Treat and one for the tag.
 A close up of the cup of candy canes and ribbon accents.
Super cure Holly Leaves and the Red Glitter Dots.
 Are you ready to craft up some of your own?  Just click on the link below for FREE printable directions!  Happy Crafting!


Thursday, December 5, 2019

3D Thursday - Tiny Keepsakes Framed Art

How's everyone doing today?  Have you got all your Christmas shopping done?  We have a cute little project for you today from guest designer Darla Watson that is sure to make a cute little gift or a great little added decor to your home.  You can find more of Darla's craftiness over on her blog Scrap Happens Here With Darla. 
Let's check out her project.
Darla made this cute little framed Art piece that goes together quickly and makes for a fun little gift or addition to your Christmas Decor.  Darla used the stamp set Tiny Keepsakes along with the new Tree punch to make her tree.  She used the Buffalo Plaid small stamps to ink up a black and white checked background.  If you'd like to make one of these adorable little pieces just click on the link below for FREE printable directions.  Have a super crafty day!


Thursday, November 28, 2019

3D Thursday - Let It Snow Flip Out Album with FREE Directions!

Hey everyone!  First of all I want to wish you all a very Happy Thanksgiving.  I'm late with my post as I'm just finishing up the dishes after having all my family over for lunch today.  It's been a pretty busy day around here!  I hope you all got enough turkey and noodles to last you awhile.  
Your in for a treat today as teammate Debbie Henderson has come up with a super cute little flip out album that would make for a great little gift for someone special.  Oh, and it just happens to be Debbie's Birthday so why don't you hope over to her blog Debbie's Designs and wish her a happy day!  I know she would love it!  Ok let's check out her sweet project.
Debbie added a shaker dome to the front of her project to make it even more adorable!
Opened up you can see that she added the pictures of her two granddaughters.  Aren't they beautiful!
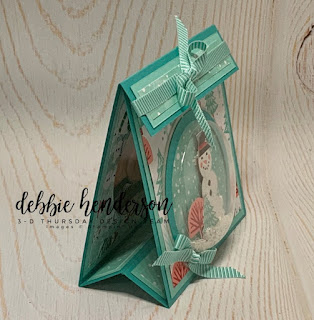
Here's a side view of her project.
and up close of the little snow dome.  SHe added some snowflake sequins to the inside.
Here's one more last view of Debbie's project.  Are you ready to make one of your own?  Then just click on the link below to print off the FREE project directions.  As always have a crafty day! 
One last thing, I'm very Thankful to all of you who check out and follow my blog.  Thank you for going along on my creative journey.
Remember to click on my store button to the left of my blog to order your crafty supplies!


Thursday, November 21, 2019

3D Thursday - Guest Designer Bronwyn Eastley

Good morning crafty peeps!  Today I have a very special treat for you.  Our guest designer this week is a good friend of mine, the very talented Bronwyn Eastley from Australia.  Bronwyn and I became friends while working on the U Stamp Design Team years ago.  We finally got to meet in person last year at Onstage in Atlanta!  So much fun!  I was super excited when she agreed to be a guest designer for us.  She does amazing work and her 3D cards are always gorgeous!  To see more of Bronwyn's work you can visit her blog Addinktive Designs.com Remember there are FREE directions for this project in the link below.  I can't wait to make one of these beauties!
Let's check it out!
Bronwyn created this pop up card using the "Peaceful Boughs" stamp set and dies bundle.
It folds down easily...
and is just as pretty from the front of the card.  She chose the DSP "Wrapped In Plaid" for her background and it's perfect for the card.
Here's a side view.  I love the planter she designed to put her arrangement in.
Here's another card she made using different cardstock and DSP.
Are you ready to try your creative hand at this card?  Just click on the link below to print off the FREE directions!  Happy crafting!
Please visit my online store to purchase any or all of the products used to make this beautiful card.  Have a crafty day!


Thursday, November 14, 2019

3D Thursday - Pillow Box Thanksgiving Place Card Holder

Greetings! and welcome to another 3D Thursday post.  I am so happy that we are back to posting every Thursday with super fun projects!  This week it was design team member Nicolle's turn to get crafty.  Nicolle came up with a pretty way to let you know where you are to sit at the Thanksgiving table.  
Let's take a look.
 Nicolle altered some of our Pillow Boxes into pretty little place setting treats.  To make the leaves she used the Gather Together Bundle.  Can't wait to make some!
If you are wondering how she wrote the names so nice, Nicolle used the stamp set Make A Difference which has all the alphabet in upper and lower case to make your own pretty words.  They look so elegant.  If you would like to create some of these pretty place settings for your table FREE directions along with pictures can be found by clicking the link below.  
Happy Crafting!


Thursday, November 7, 2019

3D Thursday - Guest Designer Kirsteen Gill

Hi Crafty Friends!  This week we have a special  treat for you!  Kirsteen Gill has agreed to be a guest designer for this week's post.  I first got to know Kirsteen when we designed together for U-Stamp and have remained crafty friends.  She does amazing work!  You can view more of Kirsteen's work over on her blog http://www.creatinwithkirsteen.com/
Let's check out Kirsteen's Project!
Kirsteen created this fun paper pumpkin pie placemat using Stampin' Up! Cardstock and Puff Paint from our Holiday catalog.  It really looks yummy, doesn't it?
How cute is this Napkin Holder!  Kirsteen used the stamp set Birds of a Feather for this one of a kind piece.  She used Stampin Blends to color him in.
 What a fun way to set the table for Thanksgiving.  You are sure to get a lot of compliments on this table setting.  I want to thank Kirsteen for creating for us this week.  Please be sure and check out her blog and leave her some nice comments on today's project.  As always if you'd like to purchase any Stampin' Up! products you can click on the "Order Online" button on the left hand side to go to my store.  Ready to make your own pie and some of these adorable napkin rings for your Thanksgiving get together.  Just click on the link below for FREE Printable directions to this project.
Have a crafty day!  See you all next week!


Thursday, October 31, 2019

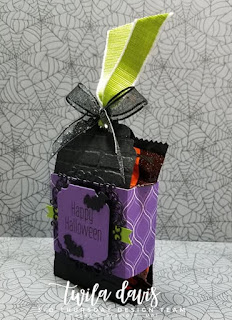
3D Thursday Blog Hop - Spooky Fun Treat Holder

Good morning! and Happy Halloween!  Oh, have we got a fun treat for you today.  Because there are five Thursdays this month, it's time for a Blog Hop featuring our four team members.  If you are following the "Hop" in order then you have just arrived from the ever so crafty Sarah Wills' Blog.  Each of us has come up with a super fun little 3D Halloween Treat.  FREE easy directions are found in our blog post today.  So be sure and hop around to all four!
Spooky Fun Treat Holder


Supplies:

Stamp Set:
To Every Season

Cardstock: 
Basic Black: (1)  8 1/2" x 2" and a scrap
Gorgeous Grape: scrap
Granny Apple Green: (1) 2 1/2" x 1/4"

Designer Series Paper:(DSP)
Brights Collection  Gorgeous Grape (1) 6" x 1 3/4", (1) 2" x 1 3/4"

Tools: Big Shot, Brick and Mortar 3D Emboss Folder, Ornate Frames Stampin' Cut & Emboss (Holiday Catalog), Punches: Classic Label, Delightful Tag Topper, Every Season Punch Pack (Bat),  Memento Black Ink, Adhesive, Dimensionals

Accessories:  1/2" Textured Weave Ribbon Granny Apple Green (6"), 3/8" Glittered Organdy Ribbon Black (10"), Candy (I used two Reese Pumpkins)


Quick & Easy Directions:

1.  Score the 8 1/2" x 2" piece of basic Black CS at 3 3/4" and 4 3/4".  Punch both ends using the  Delightful Tag Topper Punch.  Run each end through the Big Shot using the Brick Emboss Folder.  No need to emboss the (middle) section as it will be the bottom.  Fold the sides up.

2.  Score the 6" piece DSP at 1", 2", 4"and 5".  Putting adhesive on both of the 1" ends and the 2" piece attach it to the Black piece about 1/2" up from the bottom.  Add adhesive to the smaller piece of DSP and attach it over the back pieces the may have a gap showing.

3.  Using the Big Shot and Ornate Frames cut out the one shown above in Black and the other in Gorgeous Grape.  Stamp "Happy Halloween" using Memento Black on the Grape piece.  Attach the piece with saying to the black ornate frame with Dimensionals.

4.  Punch both ends of the 1/4" strip of Granny Apple Green with the Classic Label Punch as shown in the picture below. 

5.  Adhere the Green strip to the back of the black ornate piece in the middle.  Then using adhesive attach this to your treat holder.  Using scrap of Black punch out 2 bats and adhere them to the front of your treat holder as shown.  Add your treats at this time.

6.  Thread the piece of Granny Apple Green Ribbon through the holes at the top of Treat Holder halfway.  Tie the Glittered Black Ribbon around the Granny Apple Green Ribbon into a bow.  Your Spooky Fun Treat Holder is finished!

A few more pictures:

I hope you've enjoyed my fun little Halloween Project.  Now it's time for you to "Hop" on over to   Nicolle Belesimo's Blog and see what "Spooky Fun" she has come up with.  Just click on the button to go to her blog now.  
Happy Halloween!

Nicolle's Blog