Thursday, March 29, 2018

3D Thursday Blog Hop

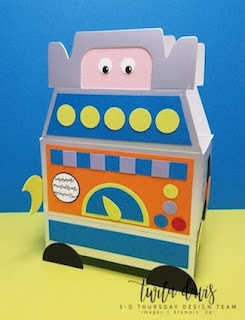
Hi everyone!  Welcome to FREE 3D Thursday.  Have we got a treat for you this week.  Since March has five Thursday in it, our team is doing a blog hop.  So this week you will get four great projects.  The project each of us is doing will center around the Silver Mini Gable Boxes that are featured in the mini Occasions catalog.  Here is my project.

My Robot Treat Box
What a fun and brightly colored Robot costume this little guy is wearing.  My idea was to come up for a Halloween Treat Box, but I think this would make a fun little Boy's Birthday Party Treat Holder.
This fun little treat box would be a fun container to fill with treats for a Costume party, Birthday party or any other fun occasion.
It's so fun to make!  I love punch art and this project is packed full of punches!  Be sure and print the FREE PDF at the end of my post so you can make your own Robot Treat Box.
It's ready to fill up and to be givin away to some lucky little kiddo.  

Thanks so much for stopping by and as promised here is the link to the FREE Printable Project Sheet.
Here's a picture of the Gable boxes.  They can in the Occasions Mini Catalog.
I hope you have enjoyed my project today and now it's time to hop on over and see what Debbie has come up with over at her Blog Debbie's Designs.  Please click on the Next button below to keep on hopping.  Be sure and stop by all 4 team members blog. 
 Thanks for stopping by and have a crafty day!


Wednesday, March 28, 2018

Paper Carrots

Hi there!  Today I wanted to share a quick and easy project for Easter.
Easy Paper Carrots made following a Sour Cream Container Tutorial.  I used our retired Designer Series Paper that I really miss!  I cut my pieces at 4" x 6", so I could get 6 from a 12" x 12" piece of DSP.  The tops are a 2" x 3" piece of green cardstock.  I used our retired Fringe Scissors to cut, then used a bone folder to curl a bit.  Rolled it up and attached to the top of the carrot.  Stamped saying and punched it out with the 1 3/4" CIrcle punch and attached it to the top.  The carrots with light green tops have chocolate candy in them.  The dark green tops have non chocolate candy in them.  These were a huge seller for me at my craft fairs before Easter this year.  Go whip you up some for your table place settings.  Thanks for looking. 
Have a crafty day!
Twila

Thursday, March 22, 2018

3D Thursday - Fun Lollipop Treat Holder

Hi! and welcome to 3D Thursday.  This week we have a pretty little Easter Treat for you!
This week's project was created by the talented Debbie Henderson over at Debbie's Designs - and she came up with a super sweet project that you will be able to print off the directions for FREE further down in the post.
And here is her project.  I just love it!  A pretty cover for a huge 2" swirly lollipop!
Such a pretty Easter Project.  I love the soft Spring colors that she used for her project.
Here is a side view that shows just the sucker tucked inside.
The stamp and die bundle Debbie used is called Picnic With You and the sentiment is from the stamp set Teeny Tiny Wishes.
Here is a picture of the yummy sucker that is inside and here is the link so you can buy some.
So as promised below you will find the link to click on to get your free PDF to make you own sucker lollipop cover.
Thanks for stopping by and have a Crafty Day!


Thursday, March 15, 2018

3D Thursday - A Truck Full Of Eggs

Hi everyone!  It's FREE 3D Thursday Time!  So sorry about being late today with my post.  My laptop charger decided to stop working so I had to order one.  Thank goodness for Amazon and overnight shipping!  I have a super cute project for you today!
This week it's my turn to be crafty.  I came up with a cute little truck the holds 6 foil wrapped chocolate eggs.  Just in time for Easter.
The truck does have a removable bed topper so it could be used to hold other things as well.  I chose to use Tempting Turquoise and Lemon Lime Twist for my truck colors to make it look Springy.
Here is a side view of the truck so you can see how the eggs fit in the bed.
And if you want, you can take the bed topper off and let the bunnies play in the eggs.
Here's a picture of the bunny driver.  The bunny stamp is from the stamp set "We Must Celebrate" and is actually a group stamp with other fun animals as well on it.  All the bunnies were colored with our Stampin' Blends.  

And as promised a FREE printable Project Sheet can be found below so you can make your own little Truck Full Of Eggs.

I hope you have enjoyed this week's project as much as I have creating for you.  If you would like to order any of the materials needed to make this little truck I would be thrilled to have you order from my online store.  Just click on the "Shop My Store" button to the left of the screen and it will take you to my online store. 
Have a Crafty Day!


Thursday, March 8, 2018

3D Thursday - Little Red Wagon

3D Thursday is here with a cute Little Red Wagon.  Get the FREE instructions in this blog post!
Hello, well it's time for another great FREE 3D Thursday project.  I don't know where the time goes!  This weeks adorable project was designed by Sarah Wills.
Sarah created this cute Little Red Wagon Seed Packet Holder using our Wooden Crate Framlits set.  I just love it!  This would make perfect little centerpieces for a Spring party.  Because this project is mostly for display it is not strong enough to put a lot of stuff in it.  But maybe if you added some extra cardboard it would be.
I love all the little extras she has added to make it something special.  From the gold clip with the bow to the cute little tag with the wooden flower.  And check out the wagon's tongue and handle.
Sarah made the wheels for her wagon using Stampin' Up! punches.  If you haven't tried our punches before you should.  They are the best!
 Now here is the FREE instructions you've been waiting for!
Any Stampin' Up! products used to make this project can be purchased through my online store by clicking on the shop now button.
Have a Crafty Day and thanks for stopping by!


Thursday, March 1, 2018

3D Thursday - A Lucky Treat

Hello! and welcome to this weeks 3D Thursday and a fun little St. Patty's Day Treat.  I apologize for the lateness in my post but I had internet trouble today.
Today's cute little four leaf clover treat bag creation belongs to Jennifer Gulch of our design team.  Jean created this St. Patty's Day Gusseted Treat Bag and Oh it is so cute!  FREE printable directions can be found at the end of this post!
Jenn made a 4 leaf clover by making and attaching 4 Garden Green hearts together along with a stem.
She then used some of our new light green glimmer paper from the Myths & Magic 6" x 6' Glimmer Paper pack to die cut a heart and add a little banner which was made using our Banner Builder Punch.  I love the little bit of Gold Metallic Thread added behind little saying for a finishing touch.  The sentiment is from the new stamp set Picture Perfect Birthday.
Such an adorable little treat bag.  Wanna make one of your own?  Here you go!  Just click on the link below.
I modified her project and made my strips 4" x 1/2" to make a smaller clover and added it to a cello bag and stamped the saying "I'm so lucky to call you my friend" from the stamp set, Sprinkles of Life.  Here's a picture of what it looked like along with some other things we made at my last workshop.
Thanks for stopping by and I hope you've been inspired today to get a bit crafty!