Showing posts with label Blog Hops. Show all posts

Thursday, September 1, 2022

3D Thursday Team Blog Hop - Embossed Treat Bags


Welcome back to this season's 3D Thursday!  If you are new to us, we are a group of Stamping Up! Demonstrators that love creating and sharing 3D projects with others for FREE!  We include FREE Tutorials with our projects that we take turns creating each week.
To start off this round we have put together a Blog Hop featuring SU Embossed Treat Bags.  The hop may or may not include a Free PDF put will have supplies listed and simple directions.  Are you ready?  There are 6 stops on the "Hop" and if you have been following the hop in order you have just arrived from Sherri's Blog Stampin' with ShareCroppers.  I love her take on the Embossed Treat Bag didn't you?  So now it's my turn.


I chose to use the stamp set and die bundle Hello Harvest (159644) to alter my bag.


The flowers are attached to a little card that pulls out from behind the pumpkin.   I got the idea from a Outside Triangle Fold Card tutorial that I found on YouTube.   I created my own version of the card for my monthly stamp group and scaled the version down to add to the front of my bag.


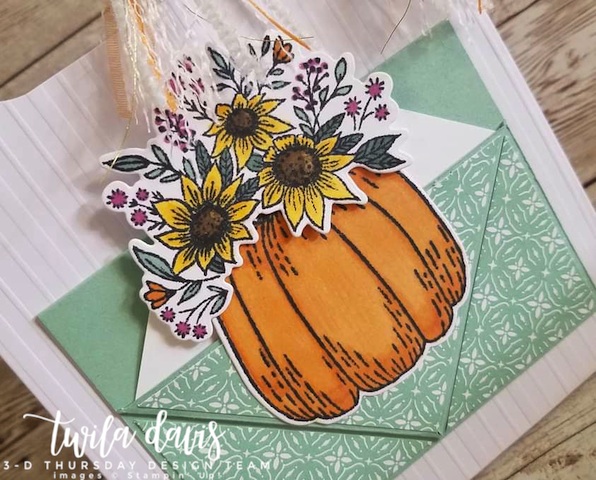
Here's a close up.  Anyone else love to color with our Stampin' Blends?  I find it very fun and relaxing.


I love to fray ribbon.  In the tutorial I tell you a little more about how I made this fun little knot of fringe.


I hope you have enjoyed my take on the Embossed Treat Bag.
Here's a quick little tutorial on how I did it.
Just click on the link below for the FREE PDF. 


And now it's time to hop over to Sarah's Ink Spot and see what she has crafted up using one of the bags.  I'm sure you will love her creation.  Just click on the button below.
Happy crafting!


Friday, September 14, 2018

My Inky Friends 2018 Holiday Catalog Showcase Blog Hop

Good morning!  Welcome to My Inky Friends 2018 Holiday Catalog Showcase Blog Hop featuring stamp sets from the new Holiday Catalog.  There are eleven stops on the hop so we hope you will take the time to stop at each one to see all the crafty projects we have created for your viewing pleasure.  If you have been following the hop in order then you have just arrived from Mary Haugens Blog - Center Stage Stamping where she showcased the stamp set Wishing You Well.  If you would like to view her projects again you can click on the previous button at the end of the post to take you back there.  The stamp set I am choosing to showcase is called Dashing Deer and it's matching Thinlits Detailed Deer Dies.
I created a 12' x 12' scrap page with a matching card.  Last weekend I attended a scrapbooking retreat and am still kinda on a scrap page kick.
   Here's a closeup of the card.  Mossy Meadow, Cherry Cobbler and Crumb Cake were my cardstock choices.  I used one of the smaller deer from the stamp set and dies and added a sweet little flower from the dies as well.  The Designer Series Paper I chose was Festive Farmhouse and I think it tones down the stamp set a bit to make it more countryish. (If that's a word.)
I sponged around all the piece of cardstock and Designer Series Paper to give it a little more depth.  I used one of the bigger deer for my scrap page and added a couple of the little filigree flowery pieces to the top corners.
 The word Christmas was stamped in Mossy Meadow and was from the stamp set Outlined Alphabet.  I hope you have enjoyed my projects and now it's time to hop over to Michelle Roberts Blog - Paper Conversation and see what she has created using the stamp set Beautiful Blizzard.  Click on the Next Blog Button below to hop.  
Thanks for stopping by and have a crafty day!
Twila


Friday, August 10, 2018

Inky Friends Suite Designs Blog Hop

Hello! and welcome to the Inky Friends Suite Designs Blog Hop.  This hop features some of the Products that make up a collection of products featured in the new catalog.  There are 10 stops on this hop so please be sure and hop all the way around so you don't miss any of the wonderful projects we have for you.  If you have been following the hop in order then you have just arrived from Mary's Blog, where she featured the Broadway Bond.  She did a wonderful job, didn't she!  The Suite that I chose to work with was the Under The Mistletoe Suite.  Here we go!
I love, love, love the Designer Series Paper that is included in this Suite.  It's just traditional Christmas and the paper just makes me happy.
I had a lot of fun making this card using the Seasonal Wreath Embossing Folder, I embossed a wreath onto white cardstock then using a dauber and Old Olive Ink I colored the wreath.  I then fussy cut it out and using dimensionals popped it up on a piece of Whisper White CS that I had embossed with the Subtle Emboss Folder.  I dyed some regular Rhinestones using my Real Red Blendies and added them to the wreath. (Note - there are Red Rhinestones available with the suite but I didn't have them yet.)
My second project is a pretty simple card using one of the mistletoe stamps for my focal point and just adding layers of cardstock and DSP.  Very Simple card.
My last projects is this Origami Christmas Tree.  The tree stand 6" tall and is made from one piece of 12" x 12" DSP.  I made a lot of these fun trees last Christmas and can't wait to make them again with the new DSP in all sizes.  Thank you so much for stopping by to check out my projects for the hop.  now it's time to venture on to Mickey's Blog and see what she has come up with using the Suite called Tropical Escape.  I'm sure you will love her creations!  Happy crafting!
Twila


Friday, February 9, 2018

Love It, Live It, Share It with My Inky Friends Blog Hop

Hello! and welcome to My Inky Friends Love It, Love It, Share It Blog Hop featuring items from the new Stampin' Up! Occasions Catalog.
 This Hop will run for 3 days beginning Friday, Feb. 9th and running through Sunday, Feb 11th.  We have added permalinks incase you are finding this post after those dates which will allow you to still hop around.  If you are following the hop in order then you have just arrived from Rhonda's Blog where she featured the stamp set Cake Soiree.  What a lovely job she did showcasing this new set.  If you decide you want to go back and take another look at her creations all you need do is click on the previous button and it will take you back.
The stamp set I chose to feature was a fun set called A Good Day.  I think this set has a lot of possibilities, and it's also just a set that makes me happy when I look at it.  In face it was the first set I wrote down on my list from the new Occasions catalog.
Let's get started...
Oh the little bunny stamp...makes such a cute baby card or could be an Easter card as well.  The sentement stamp is from the stamp set Better Together.
There are also 2 new Scallop Punches in the new Occasions catalog that pair well with this stamp set.  I used the 1 3/8" Scallop for this card along with the 1 1/4" Circle Punch.
My next project is a Twisted Easel Card that lays flat for mailing.  What a great little calendar card this stamp set help make up.  Some of you may have already viewed this card on our demo facebook page.  I made my downline these as little presenst.
And here is my last project.  Fun little Sixlet Holders.  Since Valentine's Day is right around the corner I made one for it and also a Just Because one.  The sentiment for the Valentine's one is from the stamp set Ready to Pop.  Here's the link to the How To Video.  So that's my projects.  I hope you've enjoyed viewing them as much as I did creating them.  Now it's time to hop on over to Sharleen's Blog and check out her beautiful creations using the stamp set Petal Palette.
Happy Crafting everyone!
Twila


Thursday, November 16, 2017

Stampin Friends - Happy Holidays Hop

Hello!  Welcome to this month's Stampin Friends Happy Holidays Blog Hop.  I hope you have enjoyed the hop so far and have gotten some inspiration for some crafty fun.
Now it's my turn to inspire you.
I decided to have some fun with a couple of the "Ho, Ho, Ho" stamps and created a Santa Suit Card and a Hershey Bar Wrap to match.
Focusing on making buttons from the stamps, I used our 3/4" Circle Punch for the sayings and the 1" Circle Punch for the black background behind them.  The "Ho, Ho, Ho" stamp is from the stamp set "Labels To Love".  Using the "Seaside" Emboss Folder gave the Whisper White Cardstock a fur like look.  Cardstock used: Real Red for the Santa Suit and Basic Black for the Belt and Crushed Curry for the Buckle.  I popped up the buttons and buckle with Dimensional.
A simple "Merry Christmas" stamped on the inside finishes the card.
For the Hershey wrap I used the stamp set from "Oh, What Fun", the 1/2" Circle Punch and the 3/4" Circle Punch.  Since the Hershey Bar was a bit longer than the card I though a beard might be good to add to the top.  Using a "Heart" Framelit from the "Sweet And Sassy" set I embossed it with the "Seaside" Folder and trimmed it before adding dimensionals to it and adding it to the top of the wrapper.
Since I wanted to add a saying to the inside, I tied a piece of Stampin' Up! Gold Trimmed Ribbon around with a tag saying "Merry Christmas".
I hope you have enjoyed my fun little projects and will try some of your own.
This month's Give-A-Way is the stamp set Merry Patterns.
Please be sure and read to see how you can have a chance to win this exclusive Hostess Set.
Congrats to last month's winner, Cheryl Schuessler! 
Now let's hop on over to see what creative Holiday Projects the very creative Melissa Thomas has for us!
Have a great day, everyone!
Twila


Friday, November 10, 2017

Inky Friends - Presenting The Gifts Blog Hop

Greetings all!  Thanks so much for dropping by to check out our Hop.  This is going to be such a fun hop.  I can't wait to see all the fun ideas my Inky Friends have in store for us.  If you are following the hop in order then you have just arrived from the ever so create Shelley Zarling and her blog Miss Mad Stamper.  Fantastic work!
Now it's my turn.
The stamp set / bundle I chose to showcase is called Smitten Mittens / Many Mittens.
So many fun possibilities with this set and thinlit dies.  I chose to decorate a gift bag and made some fun Hershey bar treat holders.
On the backside of my mittens I stamp the "to" and "from" stamp making them into a gift tag hanging from some of our pretty red glitter cord.
Ok now some of you may laugh at what I'm about to tell you...but one of the things that really got me hooked over 13 years ago to Stampin' Up! was that the demo showed us that you could make your own designer tissue paper just by stampin on it.  It was a "WOW" moment for me. Seriously, I was hooked after that, well and a few other things.  But this is one of the most fun and gratifying things to do and is so simple.
Now this little project right here is why I decided to get this set / bundle.  I thought the mitten thinlits would be perfect to make into little Hershey Treat Holders.  And I was right!
Here's a side view of them.  Check back next week and I will show you how I did it.  So that's all I have for you folks.  Now it's time to hop over to the very talented Sharleen Luciano's blog: Stampin With Shar .  Can't wait to see the creative things she has made for us.  
Happy Hopping everyone!
Twila


Sunday, November 5, 2017

Stamp Review Crew Blog Hop - Eastern Beauty

Hello, and welcome to the Stamp Review Crew's Blog Hop featuring the stamp set Eastern Beauty.  I am so excited to see everyone's creations using this set.   The possibilities are endless!  The thing I love most about the hops with the "Crew" is that you can always go to the "Home" link and look up all the creations at a later date.
This stamp set also has a set of matching Thinlit Dies which makes cutting out the shapes a breeze.
If you are following the hop in order then you have just arrived from the very talented Holly's Blog: Rubber Redneck .  I loved her take on this set, didn't you?
Let's take a look at my creations.
My first project I created was a simple "hello" card.  Using the new Blendability Markers  I had a lot of fun coloring the flower centerpiece.  I then cut it out using the matching Thinlit.  I backed it onto a circle stamped in the fun black outline circle stamp.  Card color choices included Pumpkin Pie and Peekaboo Peach with Whisper White to stamp my images on.  I added a Black Rhinestone to the middle of the flower to finish it off.  Simple and sweet.
My second card was a bit stepped up as I embossed the Pumpkin Pie cardstock with the Garden Trellis Emboss Folder.  I used our Stitched framlits to help draw attention to the phrase.  I again added the 6 sided flower but this time added a fun curly "q" heart to each petal, making it a bit more fancy.  I then added a few mini Gold Sequins to my phrase circle to add a little glimmer.
Here's a close up of the flowers.
I do have to admit to you that at first glance I really didn't think much of this set except for a couple of the sayings.  So that's why I bought the set.  But then I saw all the beautiful things people were creating with it and went ahead and purchased the Thinlits after the fact. 
I want to thank you for stoppping by and checking out my creations and hope that you will continue on the hop by visiting ever so creative Lou's Blog: With A Bow On Top By Lou .  I can't wait to see what she has created for us!  Have a great day everyone!