Thursday, September 27, 2018

3D Thursday - A Spooky Little Treat Holder Purse

Welcome to 3D Thursday, where every Thursday is a FREE Project Day with our Team of four Stampin' Up! Demonstrators!   For my workshop last week I made some cute little purses out of some pretty 6" x 6" DSP.  This week it is my turn to get crafty and create.  Today I have a fun project for you in the form of a cute little Halloween Treat Holder using that same idea.  Be sure and follow along and at the end of the post there will be FREE printable directions.
Here is this week's project...
A Spooky Little Treat Holder Purse, just right for Hershey Kisses or maybe some Candy Corn Flavered Chapstick?
 and...when you open it up they ghosts seem to float up and out of the inside!
 I do love this little kitty stamp.  All the stamped images are from the Stamp Set Cauldron Bubble and it's matching Framelit Dies (which make for no fussy cutting) Cauldron Framelits Dies.  Bundle the two togther and save 10%!
 Here's a side view.  The Halloween Kisses this year are super cute and match perfectly.  There is only one draw back, they are a bit bigger so you can only fit 3 instead of 4 into the little purse.
One more side view.  Thanks so much for stopping by today and I hope you have enjoyed my 3D project for this week.  If you would like to order any of the products used to make this week's project please shop online at my store.  Please enjoy the FREE Printable Project Sheet found below.  
Have a crafty day!


  You can now find our 3D Thursday Team on Facebook!   All of our projects with links to the tutorials can be found there.   Please check us out and give us a LIKE and follow us on our crafty 3D Thursdays.  Please be aware that we will still be blogging as well for those who are not on Facebook.  
Here's the link.  3D Thursday


Thursday, September 20, 2018

3D Thursday Is Here With A Beautiful Fall Banner

Hello and welcome to 3D Thursday!  This week we have a beautiful home decor piece created by the talented Debbie Henderson from Debbie's Designs.  It's beginning to look a bit like Fall which is my favorite time of year.  Debbie has created a stunning Fall Banner.  Further down in the post you will find a link to the FREE Project sheet that has directions and pictures so you can recreate one of these beautiful banners for yourself.
And here is Debbie's project.
Isn't it gorgeous!  I love the color scheme that Debbie chose for her banner.  Let's take a closer look...
 The checked background on the green panel is from our NEW Buffalo Check Background stamp.  (Which everyone needs!)  Sooo many possibilities with that stamp!  
The leaves were stamped using the NEW stamp set Falling For Leaves and diecut with matching dies, Detailed Leaves.
 The Gold Library Clips hold the banner in place which is stung together with our NEW Braided Linen Trim and the Doilies shapes from the NEW dies Detailed Baubles Thinlets.
 The letters were cut out using the Large Letter Framelits which are a must have for any crafter.
Here's a picture of the close together.  So pretty 
and one last look at Debbie's Fall Banner.
If you are ready to make one of these beautiful Fall Banners then you will find the FREE printable directions below.  Happy Crafting!


Friday, September 14, 2018

My Inky Friends 2018 Holiday Catalog Showcase Blog Hop

Good morning!  Welcome to My Inky Friends 2018 Holiday Catalog Showcase Blog Hop featuring stamp sets from the new Holiday Catalog.  There are eleven stops on the hop so we hope you will take the time to stop at each one to see all the crafty projects we have created for your viewing pleasure.  If you have been following the hop in order then you have just arrived from Mary Haugens Blog - Center Stage Stamping where she showcased the stamp set Wishing You Well.  If you would like to view her projects again you can click on the previous button at the end of the post to take you back there.  The stamp set I am choosing to showcase is called Dashing Deer and it's matching Thinlits Detailed Deer Dies.
I created a 12' x 12' scrap page with a matching card.  Last weekend I attended a scrapbooking retreat and am still kinda on a scrap page kick.
   Here's a closeup of the card.  Mossy Meadow, Cherry Cobbler and Crumb Cake were my cardstock choices.  I used one of the smaller deer from the stamp set and dies and added a sweet little flower from the dies as well.  The Designer Series Paper I chose was Festive Farmhouse and I think it tones down the stamp set a bit to make it more countryish. (If that's a word.)
I sponged around all the piece of cardstock and Designer Series Paper to give it a little more depth.  I used one of the bigger deer for my scrap page and added a couple of the little filigree flowery pieces to the top corners.
 The word Christmas was stamped in Mossy Meadow and was from the stamp set Outlined Alphabet.  I hope you have enjoyed my projects and now it's time to hop over to Michelle Roberts Blog - Paper Conversation and see what she has created using the stamp set Beautiful Blizzard.  Click on the Next Blog Button below to hop.  
Thanks for stopping by and have a crafty day!
Twila


Thursday, September 13, 2018

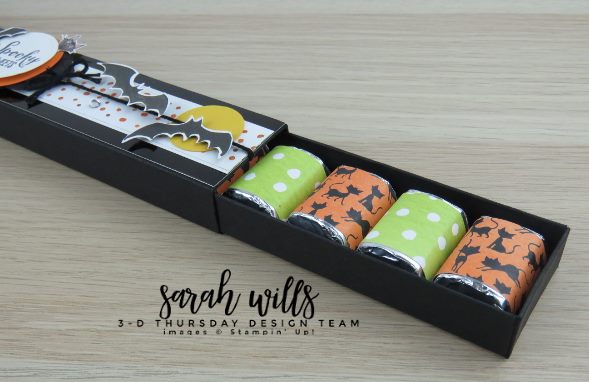
3D Thursday - Halloween Long Nugget Treat Box

Welcome!  Thanks for stopping by today for another 3D Thursday Project.  Today's project is a super cute Halloween Long Nugget Treat Box designed by the super crafty Sara Wills from over at Sarah's Ink Spot.  What is great about our 3D Projects is that at the end of the post we include a Project Direction Sheet that you can print off and make for yourself for FREE.  Let's get started with some pictures.
Isn't this just box too cute!  Sarah made a Basic Black Box and added a strip of Toil and Trouble DSP for the trim.  
Next She used our Spooky Sweets stamp set as her focal point.  The new Toil and Trouble DSP and the Cauldron Framelit Dies are a perfect match for cutting out the shapes in the Designer Series Paper.  No fussy cutting here.  Yeah!
Here's a picture of the box open and the wrapped Hershey Nuggets.  The box holds nine.
The matching Bat Punch makes cutting out the bats a breeze and a fun job at that.  If you would like to recreate Sarah's Box simply click on the link below to print of your own directions for FREE.  Yup that's what I said FREE directions right here every Thursday.
Have a crafty day!
Keep on Stampin'!


Thursday, September 6, 2018

3D Thursday - Timeless Tidings Home Decor Project

Welcome to 3D Thursday!  This week's project is brought to you by the talented Jennifer Gulch.  She has come up with a very pretty home decor project worthy of your favorite picture.  At the end of the post there will be a link to click on to print out the FREE Directions for this beautiful project.
Let's take a look at it.
Jennifer chose to use a 12" x 12" piece of Cherry Cobbler Cardstock as her base and then added a layer of our beautiful Delightful Detailed Laser Cut Designer Specialty Paper for an overlay.
 Here's a closeup of the beautiful flower and the Merry Marlot Copper Ribbon.  Are you ready to make one of your own?  I know I am!  Click on the link below for your FREE printable Project Sheet.  Have a crafty day!


Wednesday, September 5, 2018

2018 Holiday Catalog by Stampin' Up

Today is the day!  You can now order all the wonderful things on your wish list from the Holiday Catalog.  If you haven't received one yet, leave a comment and I will be happy to send one to you.
Happy Crafting!
Twila

Tuesday, September 4, 2018

Quick & Easy Banner Punch Treat Holder

 Today I have a fun little quick and easy Treat Holder for you.  Chocolate has to be my favorite little treat to make treat holders for.  I was looking at pinterest the other day and found one similar to this that just held one Hershey Nugget.  And I thought more is always better right?  This cute little Daisy Treat is what I came up with using the Banner Punch and just in time for my monthly Stamp at the Farm group.
Below I have some quick and easy instructions for you.  I don't know about you but I am a visual person.
One quick tip for you. always remember to use heaveir adhesive, (such as tear tape) when adhering something that doesn't lay flat.  Use snail for things that lay flat.
Have a crafty day!
Twila
Supplies
Stamp Sets: Daisy Delight, A Big Thank You
Cardstock: Old Olive, Whisper White
DSP: 6" x 6" Designer Series Brights
Ink: Old Olive, Mango Melody
Tools: Stampin' Trimmer, Banner Punch, Daisy Punch, Paper Snips, Tear Tape, Glue Dots

Wednesday, August 29, 2018

3D Thursday Is Here With A Team Blog Hop!

Greetings!  Welcome to 3D Thursday!  This 5th Thursday of the month we have a Blog Hop for you!
Today we have a quick little Blog Hop for you featuring Stampin' Up!s Cello Bags.  Our Cello Bags come in three sizes and are of a very nice quality.  They can be found on page 193 of our Annual Catalog.  If you are following our Hop in order then you have just arrived from the ever so crafty Sarah Wills Blog - Sarah's Ink Spot.  I hope you are enjoying the fun little Hop so far.
Now onto my project.  I decided to use the 2" x 8" Cello Bags.
A treat for a friend which is made with chocolate is never a bad thing.   I love the Specialty Designer Paper called Share What You Love.  It's so pretty and can be used for anything and everything.
I did want to share a fun little punch tip with you.  Did you know you can alter your punched piece to any size you want?  I used our Everyday Label Punch to make the perfect size label for my Cello Bag saying from the stamp set Treat Time in Tranquil Tide onto a piece of Whisper White Cardstock then punched it out.  Next I slide it back in the punch from the side to make it the perfect size for my topper!  I have added just what I used and the sizes of cardstock below incase you would like to make some little Treat bags of Your own.  Now it's time to Hop over to the very talented Debbie Henderson's Blog - Debbie's Designs and see what she has come up with using the Cello Bags.  
Have a crafty day!
Click on the link below to hop over to Debbie's Blog.
Supplies:
Stamp Set: Treat Time
Cardstock: 
          Tranquil Tide (Topper) 2 1/2" x 4" score at 2" on the long side, (Nugget Backing) 1 1/2" x 4".  
          Whisper White Scrap - (For Label Saying)
Designer Series Paper: 
           Share What You Love Specialty DSP (4) 1" x 3" strips for Nugget wrappers. (2) 3/4" x 2 1/2" 
           for topper front and back.
Tools: Everyday Label Punch, Stapler
Other: Dimensionals, 2" x 8" Cello Bag with 3/4" cut off the top, Double Sided Tape, 


Saturday, August 25, 2018

3D Thursday - Gift Package Gum Holder

Hey everybody, sorry my post is a bit late.  We have been on a short vacation with our family and I've been away from my computer.  So here you go...
Welcome to 3-D Thursday and this week we have a sweet gift treat for you that is perfect for batch making and features some brand new, upcoming products with a festive feel!  This week’s project was created by the fabulously talented Debbie Henderson over at Debbie's Designs and she came up with this fabulous project – further down this post you will find a link to the FREE Project Sheet that has step by step instructions & color photos so that you can create your own beautiful project.
And here it is!
 Such a cute way to wrap up a pack of gum isn't it?  I love those gift bows on top!  They are from the brand new set Bring on the Presents featured on pg 16 of the new Holiday Catalog which goes live for customer order on September 5th, and guess what – to make it easy to cut out those pretty bows, there are coordinating dies in All The Presents Thinlits Dies AND even better – they come in a BUNDLE to save you 10%!
The belly band and box are papers from Festive Farmhouse DSP that you can find on pg 13 of the Holiday Catalog and because they are double-sided, the inside looks pretty too!
Slide off that pretty bow adorned belly band and the paper unfolds to reveal the contents…a pack of gum!
You can get the stamp set and set of dies used on this project together as the Bring on the Presents Bundle to save you 10% which will be available for purchase on September 5th – here are the images included in this bundle:
This would make a great little gift for co-workers or teachers.  Are you ready to make some?  Just click on the link below to print off your FREE Project Sheet!  Happy crafting!