Monday, January 9, 2017

Downline After Christmas Party - Part 2

After we ate lunch we were ready to start in so the first thing we did was play Dirty Santa.  This is a game where you draw numbers and then by numerical order pick a gift to unwrap or you can steal a gift that someone else has already picked and unwrapped.  Number 1 gets to go again at the end, so they can steal from anyone.  We had a lot of fun.  Here's pictures of who ended up with what.
Leila ended up with the frame that Robin altered.
Glenda ended up with the Clothesline frame that I altered.
Robin ended up with the vase and jar that Teresa altered.
Brenda with the canvas that Lori altered.
Lori with the gift that Leila brought.
Teresa with the candle that Leona altered.
Leona with the cup that Glenda altered.
Me with the bracelet (on my wrist) and the little bag she made to put it in.  It was tons of fun with the gals.  Stay tuned for part three tomorrow.  Swaps!
Have a great day!

Sunday, January 8, 2017

Downline After Christmas Party - Part 1

Yesterday was one of my favorite parties of the year, my downline after Christmas Party.  These ladies have become some of my best friends.  I would never have met some of them if it hadn't been for stampin.  We had a great time togther.  eating, stampin, andt trading gifts.  Today's post is to show what I made for each of them and my gift for our gift exchange,
I made each of my girls one of these cups filled with some fun goodies.  This cup is double the size of my little Christmas cup.
 Here is the project I decided to work on.  It's called a clothesline board.  I bought it at Hobby Lobby last year.
I used some of our new DSP called Tasty Treats Specialty Paper to alter it.  I also used the Scallop Tag Topper Punch and the Large Letters Framelits.
Thanks for looking and have a good day!
                  Twila

Wednesday, January 4, 2017

2017 Occasions Catalog!

So excited for the launch of our new Occasions Mini and Sale-a-bration Brochure!  Check this fun little video out and the place your order today!

Friday, December 30, 2016

Stampin' Addicts Sale-a-bration Blog Hop

Hi everyone! and welcome to Stampin' Addicts Sale-a-bration Blog Hop.  This is my favorite time of the year while being a Stampin' Up! Demonstrator.  Why? because it's when customers receive something FREE from the Sale-a-bration flyer for every $50 that you spend.  I love FREE stuff don't you?  So be sure and contact your demo and get your FREE stuff asap!  So this hop is showcasing some of the products you can get for FREE.  If you are following the Hop in order then you have just arrived here from Rhonda's Blog: The Stampin Bunny where she wow'd us with some super cute ideas using the new DSP called Carried Away.   Love her craftiness.  Now it's time for my projects using the stamp set called "So Very Much".
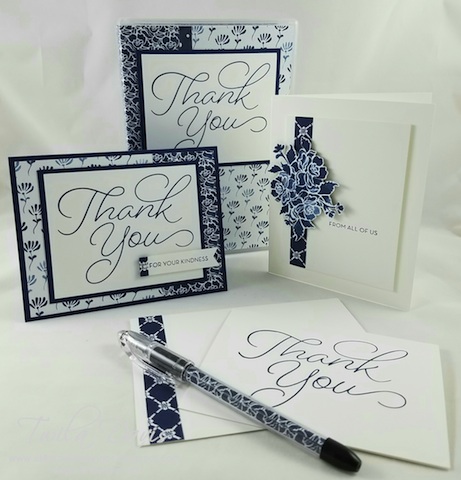
Such a beautiful stamp set and it stamps beautifully as well.  I chose the Floral Boutique DSP to use with it as I thought it would really showcase just how delicate the words were and I didn't want to use another stamp set with it as to maybe take away from the simplicity of it.
 My first project was just a simply Thank You card.  I did adhere a little of the DSP to the envelope to dress it up a bit.  I used Night of Navy Ink on all my projects.
 For my second project I wanted to make a more colorful card.  Making the background Night Of Navy and added DSP.  I also wrapped a tiny bit of it to my Kindness banner and finished it off with a tiny pearl inside the little flower.
For my third project I chose to use just the smaller stamp "From All Of Us" to show that it could that the stamp set could be used for something other than Thank You.  So the inside of the card could say Happy Birthday or Congrats, you get the idea.  I fussy cut one of the flower motifs from the DSP this time and used some dimensionals to pop it up a bit off the cardstock.
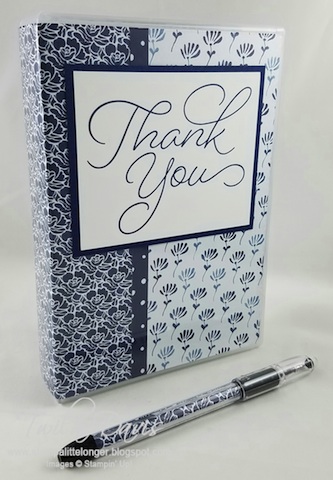
We usually make a 3D project for our hops also.  I was kinda stumped on this one because of the size of the stamp size.  Therefor I designed a Thank You card case using one of our bigger plastic stamp cases.  Super fun and easy project.  Just cut to size and slip in your DSP inside the clear plastic sleeve cover on the case and then if you want add a saying to the front on top of the plastic sleeve.  Then I needed to add a matching pen, which is an RSVP pen with a piece of matching DSP in the barrel.  This would make a very nice gift set.  Thank you so much for hopping with us and now it's time to hop on over to Sara's Blog: Lily's Ink Pad and see the super cute projects she has made using the Tasty Trucks stamp set.  I can't wait!  Just click on the "Next Blog" button and away you go!


Monday, December 19, 2016

Stamp Review Crew - Sweet Stack

Hello everyone, I am so excited to begin this new fun journey as a part of the Stamp Review Crew.  For those who have never heard of it here is a little background.  We are as international group of Stampin' Up! demonstrators that get together on the first and third Monday of every month to do a blog hop.  Each hop features a single stamp set to give you lots of inspiration for that set.  
This hop features the stamp set Sweet Stack and if you have been following the Hop in order you have just arrived from Betty's Blog.  She created such a beautiful set of cards, didn't she?
Sweet Stack
I knew I had to have this set from the first time I saw it in the catalog.  Maybe not just for the stamp set but for the framelits that went with it.  So fun to be able to make a piece of cake.  Doesn't it look yummy?  When I was younger I remember going to a tupperware party at a friends house and she had made a cake using the neapolitan ice cream.  So I recreated a piece of cake to look like it.  It was really good by the way.
My card actually came second after I made the piece of cake.  I decided to stamp the layers again in the three different colors, Peekaboo Peach, Mint Macaron, and Flirty Flamingo.  I then cut them out as little strips and put them behind my stamped image.  I added the a layer of Flirty Flamingo embossed with the Big Dots folder to give it a little more pop.
Now it's time to hop over to Kelly Kents Blog and see what creative inspiration she has for us.


Thursday, December 15, 2016

Stampin Friends December Blog Hop - New Year Celebrations

Hello and welcome to the Stampin' Friends December Blog Hop.  This month's theme is New Year Celebrations.  I can not believe that in just a few short weeks it will be 2017!  Where did the year go?There are 10 stops on the hop and if you are following the hop in order then you have just arrived from Carolina Evans' Blog.  Wasn't her craftiness wonderful!
Now it's time for me to show you my craftiness.
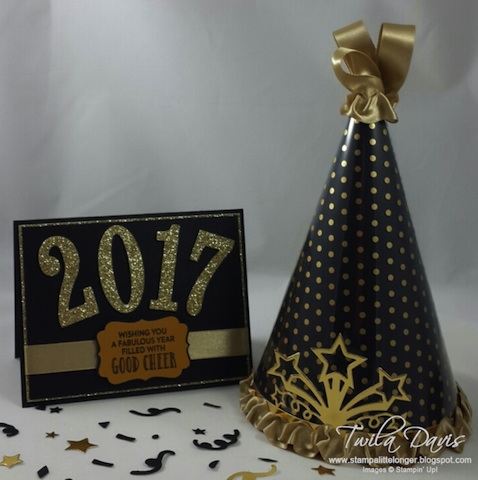
Anytime I think of New Years I think of the date change, party hats and confetti. 
I created a fun party hat.  Started with Basic Black cardstock but thinking it was going to be too plain I then added a layer of our Fabulous Foil Designer Acetate.  I also used Stampin' Up!s 5/8" Gold Satin Ribbon at the bottom and the top using Doublesided Tape Strip.  The finishing touch is the Star Blast in Gold Foil Paper.  This is a new Star Blast Edgelits Die in the 2017 Occasions Catalog.
My 2017 card was created using our wonderful Large Number Framelits and Gold Glimmer paper.  The Good Cheer saying is from the stamp set Stitched With Cheer.  
Thank you so much for hopping with us this and now for a special Give-away surprise.
Leave a comment with #SFDecHop and continue on the hop and keep commenting on each blog post for more entries.
Now it's time to hop on over to Steph Jandrow's blog and see what she has created for your viewing pleasure.  


Blog Hop Roll Call

  3.Twila Davis  -  You are here
  8. Kim Lamos

Tuesday, December 13, 2016

Merry Little Mitten

Hi everyone!  Brrr is it cold here today in Southern Illinois.  So today I thought I would share with you this cute little altered mitten.  These sold really well for me at craft fairs this winter.  I bought our local JoAnn's out of these little red mittens, even went back and bought some navy blue ones.
This little mitten is a perfect holder for a small candy cane and a Hershey chocolate Santa.  It would also make a great gift card or money holder and would be cute hanging from the tree.  I used Stampin' Up!s Pretty Pines Thinlets Dies and added some pine needles in Garden Green, a Real Red Ribbon Bow,  Merry Little Christmas Tag from the Hostess set Holly Jolly Layers hanging from a Candy Cane Lane Baker's Twine loop.  I used my handy glue gun and glue sticks to fasten them down.  Thanks for stopping by and have a great day!
Twila

Friday, December 9, 2016

Little Cup'a Chocolate

More craft fair goodies. I had so much fun making these. The inspiration for the idea came from Brigitte Keiling and added a saucer to mine. what a fun little place setting this would be at a Christmas party. hmmm
I been selling these at craft fairs and I display them on a small cake plate.
Here is a little bit more of a closeup.
Thanks for stopping by!  Have a great day!
Twila

Wednesday, December 7, 2016

Merry Little Christmas Stocking

Here is a fun little project I thought I would share with you today.  It's a cute little stocking box perfect for a mini Hershey bar.  I used the biggest of the stocking dies from the Christmas Stocking thinlets dies and cut out two using Real Red cardstock.  Then I ran them through the Big Shot using the Festive emboss Folder.  To connect them together to make a stocking box.  I cut a piece of Real Red cardstock 7/8" x 5 1/2".  Scored it at the widthways at 1/4" and 5/8".  Then lengthways at 2 1/4" and 3 1/4".   Then at the lengthways scores cut in to where the scores met then folded it up to make a U shape then glued it in place and two both sides of the stocking pieces.  I added  a small strip of the Candy Candy Lane DSP to the top.  Stamped and punched out a few little tags from a retired stamp set, added a little bow and a little loop of red and white twine to hand it with.  I think the little mouse is pretty happy with his stocking by the look on it's face.
Thanks for stopping by today!  Hope to see you again soon.
Twila

Saturday, November 26, 2016

New Occasions Catalog Coming to Your Mailbox Soon!


Going to be mailing out the New Stampin' Up! Occasions Catalog and Sale-a-bration Flyers. If you would like to have one sent to you and are not on my regular mailing list.  So what is so specail about the Sale-a-brationg flyer?  It is filled with FREE products you can earn for every $50 that you spend.  WOHOO!!! Leave me a comment and I will be happy to send one your way.

Stampin' Up! Online Extravaganza - Don't Miss it!


Ha! Ha!  This cute graphic was posted by Patty Bennett on Facebook and I just had to share it here.  Don't forget to place you order.  Just a few days left to get in on the hot deals!
If you click on the "Order Stampin' Up! Online" button on the left hand of your screen it will take you right to my website where you can purchase all the goodies you want.
If you are placing an order of less than $150 please use Hostess code D7NJYCHN.  Orders of $150 or more please place as an individual order so you can get some free goodies of your own.
Thanks for stopping by and have a wonderful day!
Twila

Wednesday, November 23, 2016

Snowman Fun with Hershey's Chocolate Bars

It's raining and cold outside so it's a perfect day to stay inside and get some crafting done for upcoming craft fairs.  Hershey Bar Wraps always seem to sell good for me at events so after looking at some on pinterest here is what I came up with.
Here's some of the details if you want them.
His hat is a piece of fleece 6" wide x 5 1/2" long. Easier if you sew a 6" wide piece by a longer length then you can just cut off every 5 1/2". Fold in half width ways, and sew sides together using a small seam. turn it rightside out roll one end up 2x's then put on candy bar. Wrap some twine or string around for top of hat and secure. Cut fringe with scissors. Scarf is a 1/2" x 12 piece with fringed ends with scissors. I used the Festive Flower Builder Punch for the nose and mouth. Owl Builder Punch for eyes. His buttons are made from a retired small flower punch.
Thanks for stopping by!  Have a crafty kind of day everyone.
Twila

Monday, November 21, 2016

Crafty Christmas Smorgesborg!

Here are the 12 projects from our last stamp camp.  We had so much fun crafting and visiting with friends and family.
Here are my projects that I had for stampers to make.  The Joy card is a case from Stamp With Kristin, it's a beautiful card.  The little snowman is a wrapped roll of peppermint Lifesavers.
 Here are Shannon's projects.
and here are Kelly's projects.
Thanks for stopping by today and looking.  Have any questions about a project you see here just send me an email to tjdstampsalot@yahoo.com and I will try and answer them for you.  Enjoy your day and have a great Thanksgiving!
Twila

Thursday, November 17, 2016

Stampin Friends November Blog Hop - Happy Holidays

Welcome to the Stampin Friends October Blog Hop.  I am so happy to have you join us!  This months Hop theme is Happy Holidays.  If you have been following the hop in order then you have just arrived from Kathie Rotti's Blog.  You will continue to follow the hop by clicking on the next button at the bottom of this post and you will make a loop back to where you started. 
So let's get started with my projects: 
Instead of featuring a stamp set I decided to feature a set of Washi Tape called Candy Cane Lane which can be found in Stampin' Ups Holiday Catalog.  I chose to make a set of coasters and a matching card.  I LOVE washi tape and have a tendency to buy it and never use it so I thought this would be the perfect time to get this cute set of tapes out and see what I could come up with.
I made a set of 4 coasters with a box to keep them in.  I ran strips of the different kinds across the coasters leaving about a 1/4" of blank coaster all the way around the added strips of the striped washi tape around the outside of them.  I added a square of red felt to the back to give it a little more weight.  The box was made from Real Red Cardstock and I added a strip of washi tape around the outside top of the box.  Using the Real Red 3/4" Stitched Edge Ribbon I tied a bow around the completed box to finish it off.
For the matching card I first embossed a tree branch using the Pine Bow Textured Emboss Folder and then used just the very top part of the round Delicate Ornament Thinlit and then cut the rest of the circle out using a circle diecut from the Layering Circles set.
I cut a 3 1/2" x 2 1/2" Whisper White square and covered it with the washi tape and adhered it to my cardfront base where I wanted it to be and then added dimensionals to my top layer with the ornament cutout, added a layer of Crumb Cake to my card base and put the card together.  A little silver bow and a Merry Wishes stamped in Real Red and it was done.
I hope you have enjoyed my projects and do hope you will leave me a comment because...
Whoop!  Whoop!  We have some fun giveaways for one lucky person.  So be sure and leave us a comment with #SFNovHop to begin it and you will be entered in the drawing.  Good luck!
Now it's time to "Hop" on over to Melissa Thomas' Blog.  Have a great day everyone!