Thursday, October 29, 2020

3D Thursday Blog Hop Featuring SU Mini Paper Pumpkin Boxes


Hello!  Since there are five Thursdays in October it's time for a Team Blog Hop.  For this Hop we will be featuring the SU Mini Paper Pumpkin Boxes.  If you have been following the Hop in order you have just arrived from Nicolle's Blog.  Didn't she come up with a Wow! idea using the box?
Now its my turn to share.
Oh how I love making fun Halloween Treat Boxes so... I decided to make 
a Monster Treat Box out of the Mini Paper Pumpkin Box.
Here's a picture of what the mini boxes look like to begin with.
Punch Art is also one of my favorite things to work with.  Using Embossing Folders, Circle Punches and the new mini Acorn Punch I made him come alive.
Fill him up with candy...
Shut him back up and he is ready to delight any grandkid or friend. 
 Now it's time to hop over to Debbie's Blog and check out her Wow! version of the altered Mini Paper Pumpkin Boxes.  Just click on the link below.   I have also added supplies and a few measurements below the link to help you make a version of my monster box.  Be sure and come back and grab them later.
Crafty Hugs!
Twila
 

Supplies for Monster Box
Ink: Bermuda Bay
Cardstock: Bermuda  Bay
(2) 1" x 3 3/4", (2) 1" x 5 3/4", (1) 3 7/8" x 5 3/4" strips 
Scrap of Whisper White, Basic Black, & Granny Apple Green
Punches: Circle 2", 1 1/2", 1" (retired), Acorn Punch from Autumn Punch Pack
Tools: Big Shot, Old World Emboss Folder, Hammered Metal Emboss Folder, 1/2" x 3 1/2" die from Stitched Rectangle Dies
Other: Black Marker, Dimensional, Liquid Glue, Sponge Dauber, Scissors, Candy
Tip: when cutting out window, just add a bit of Snail to the biggest piece of Bermuda Bay CS and attach it to box top. Run through BS using Rectangle Die.  You will have to play around to find the right sandwich.  It will not cut all the way through the box. So take CS piece off and use scissors to cut out the imprinted shape.  Good luck!


Thursday, October 22, 2020

3D Thursday - Guest Designer Sue Poile

Welcome to this week's 3D Thursday post.  I'm excited about the Guest Designer this week as she is a dear friend of mine from when we designed a few times on UStamp together.   Sue Poile from over at Creative Designs By Sue is in our designer chair this week.
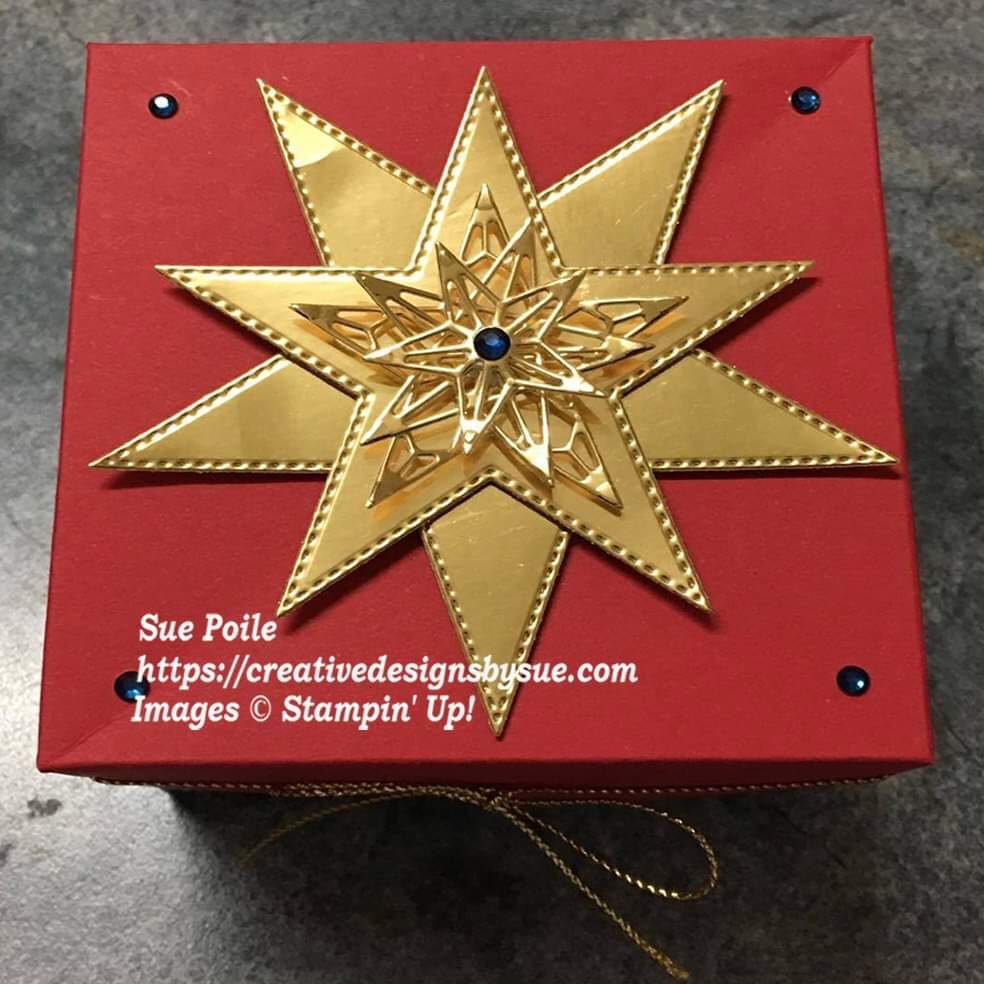
Let's take a look at Sue's beautiful Christmas Box she crafted up for us.


Sue used Real Red & Misty Moonlight for the base of her box and lid. Then added Feels Like Frost DSP to the base.


The beautiful focal point on the top was created with our Stitched Star Dies and Brass Foil Sheets.  What a Wow! Gift Box.
Directions can be downloaded for Free by clicking on the link below.
Thanks again Sue for designing this week's project.
Crafty Hugs everyone!


Thursday, October 15, 2020

3D Thursday - Shaker Top Round Gift Tin

Good morning!  This week our project was created by teammate Nicolle Belesimo.  Nicolle created a fun little shaker gift tin for us!  Remember Free directions can be found at the end of the post by clicking on the link. 
 Lets check out this week's project!
Nicolle used the stamp set Life Is Beautiful for the main focal point and added the sentiment from the stamp set Little Treats.
She added some of the Sequins For Everything to finish off this adorable project.  Are you ready to make one?  Just click on the link below.  Remember you can always shop my store for any crafty supplies.
Have a crafty day!


Thursday, October 8, 2020

3DThursday - Magic Treats and Gift Card Box


Hi everyone! Welcome back for another fun Free 3D Thursday Project day.  This week we have guest designer Jennifer Merle -Hamscher in the creator chair.  Jennifer has created a cute little treat box or gift card holder.  You can find more of Jennifer's creativity at Whispers In Ink  Let's check it out and remember FREE directions can be found by clicking on the link at the bottom of the post.


Jennifer used a pretty combo for her treat box.  Magic in the Night DSP was her choice for background.  Yes its Halloween DSP, but it isn't just for Halloween.
Let`s see what the inside looks like. As you can see it holds a lot.
Jennifer also made a Halloween box too.  So cute!
Are you ready for free directions?  Just click on the link below.

Have a crafty day!


Thursday, October 1, 2020

3D Thursday Is Back With A Cute Halloween Treat Box!

Hello!  Our team is so excited to be back up and creating once again!  What a long summer it was.  There are so many fun and wonderful new stamps and products in the new Holiday Catalog and the regular book as well.  So to kick off things the very talented Sarah Wills is first up with an adorable Halloween Curvy Treat Box.  You can find more of Sarah's creations over at Sarah's Ink Spot.
Let' check out Sarah's Project!
  
Anyone that knows me, knows that I love Halloween Treats.  Sarah has me super excited about this little one that she has created for us!  Sarah used the stamp sets Ghoulish Goodies, Have a Hoot, and Banner Year.
Here is a Sideview of the box.
Top view, so you can see the treats.
Top view with ribbon.  I love our Black Glittered Organdy Ribbon and was super happy that they put it back in the new catalog.  It really dresses up a project.
The dies for the sides of the box are from the Hippo and Friends Die Set.  Be sure and. Heck out all the fun extra dies in that set.
One more final picture of this adorable project.  Are you ready to make one?  I am!  Just click on the link below for the FREE Printable Directions.  Thanks for joining me today Nd see you back here next week!
Crafty Hugs!
TWILA


Sunday, September 6, 2020

Triple Cube Card Made Easy

Good morning everyone!  I hope you are enjoying the Labor Day Weekend.  This past week I was honored to be a guest designer over at Splitcoaststampers.  I chose to make a Triple Cube Card for my project.  It's pretty simple though it looks hard to make.  Your friends and family are sure to say Wow when they open it up.
Here is a simple version as shown in the tutorial.
 Below I used the smaller Daisy Punch to add a little more to the card.
Just click on the video below to watch how I made the card.

Click on the link below for the printable tutorial the I wrote up for the project.
Triple Cube Card
Thanks for stopping by!
Crafty Hugs!
Twila

Monday, August 31, 2020

Grandsons Birthday Cards

Our Grandsons turned eight in July. I can not believe how fast the time has gone by. I always enjoy making them each a unique card to each of their liking. ALthough they are triplets they each have very different personalities and likes. I hope you will enjoy looking at their cards.
I'll start with Reid's card since he was the first born.  Reid loves to play the Nintendo Switch.  I found a great card to case from Pinterest and just changed the number.
Cade is the middle man and he loves Pokemon.   Found a fun card on Pinterest and made it my own.
Jace is the youngest by about 3 minutes.  Jace enjoys riding his dirt bike.
Since his was a bit plain or so I thought I added eight candles to the indie of the card.
Thanks for stopping by today and looking at what I've been up to.
Crafty Hugs!
Twila


Friday, July 3, 2020

3D Thursday - Summer Break

Good morning everyone!  We will be taking a break for the summer.  Wishing everyone a blessed and happy summer.  I'll see you back on October 7th with some more FUN and FREE 3D projects.
Crafty Hugs!
Twila

Thursday, June 25, 2020

3D Thursday - Patriotic Pinwheels!

Happy Thursday, everyone!  I have a fun project for you, just in time for the 4th of July! Teammate Nicolle Belesimo was at the craft table designing for us this week.  You can find more of her craftiness over at Ellocin Designs.  Nicolle designed these super cute Patriotic Pinwheels!  Let's check it out.
These pretty pinwheels will make a great decor piece as we settle into the month of July next month.  (That's crazy how is that even possible?)  It's been such a crazy year for everyone, I do hope we can all just relax a little on the 4th and be thankful.
Nicolle used a star stamp from the stamp set So Much Happy and Cherry Cobbler and Misty Moonlight Ink to stamp the stars onto her DSP.
 By using the 6 x 6 DSP Paper stack no need to cut the paper down, it's already done for you.  Just cut in at the sides like the directions show.  I will note that these do not spin so are only for decor.  But wouldn't they be cute in summer colors too!  I hope you have enjoyed today's project!  now just click on the link below to print them off and make your own!
Crafty Hugs!
Twila

Thursday, June 11, 2020

3D Thursday - Patriotic Mini Paper Pumpkin Box

Good morning crafty friends!  This week it was my turn at the create desk.  And since 4th of July is right around the corner I thought it would be fun to create a Red, White, & Blue project.  Below is what I came up with and if you would like directions to it you are in luck because they are FREE.  All you have to do is click on the link at the bottom of my post to access them.
 This project goes together pretty quick and easy.  The base is actually a Mini Paper Pumpkin Box which you can find in the new Stampin' Up! catalog.
 I used some of the new In Color DSP named Misty Moonlight to cover my box.  Streamers of new and retired ribbons are attached at the back of the box.
I think the funnest part of the project was using our new Foam Adhesive Sheets!  Oh, so fun!  I attached some of a sheet to the back of a Whisper White scrap and cut out my Stitched Star to be attached to my box.  I love the feel and depth it gave to it!  Now if you would like to make one of these fun little decor boxes just click on the link below to print out FREE directions!  If you are in need of some new products I'ld love for you to shop my online store by simply clicking on the shop button in my sidebar.  Thanks for stopping by today!
Crafty Hugs!