Wednesday, August 29, 2018

3D Thursday Is Here With A Team Blog Hop!

Greetings!  Welcome to 3D Thursday!  This 5th Thursday of the month we have a Blog Hop for you!
Today we have a quick little Blog Hop for you featuring Stampin' Up!s Cello Bags.  Our Cello Bags come in three sizes and are of a very nice quality.  They can be found on page 193 of our Annual Catalog.  If you are following our Hop in order then you have just arrived from the ever so crafty Sarah Wills Blog - Sarah's Ink Spot.  I hope you are enjoying the fun little Hop so far.
Now onto my project.  I decided to use the 2" x 8" Cello Bags.
A treat for a friend which is made with chocolate is never a bad thing.   I love the Specialty Designer Paper called Share What You Love.  It's so pretty and can be used for anything and everything.
I did want to share a fun little punch tip with you.  Did you know you can alter your punched piece to any size you want?  I used our Everyday Label Punch to make the perfect size label for my Cello Bag saying from the stamp set Treat Time in Tranquil Tide onto a piece of Whisper White Cardstock then punched it out.  Next I slide it back in the punch from the side to make it the perfect size for my topper!  I have added just what I used and the sizes of cardstock below incase you would like to make some little Treat bags of Your own.  Now it's time to Hop over to the very talented Debbie Henderson's Blog - Debbie's Designs and see what she has come up with using the Cello Bags.  
Have a crafty day!
Click on the link below to hop over to Debbie's Blog.
Supplies:
Stamp Set: Treat Time
Cardstock: 
          Tranquil Tide (Topper) 2 1/2" x 4" score at 2" on the long side, (Nugget Backing) 1 1/2" x 4".  
          Whisper White Scrap - (For Label Saying)
Designer Series Paper: 
           Share What You Love Specialty DSP (4) 1" x 3" strips for Nugget wrappers. (2) 3/4" x 2 1/2" 
           for topper front and back.
Tools: Everyday Label Punch, Stapler
Other: Dimensionals, 2" x 8" Cello Bag with 3/4" cut off the top, Double Sided Tape, 


Saturday, August 25, 2018

3D Thursday - Gift Package Gum Holder

Hey everybody, sorry my post is a bit late.  We have been on a short vacation with our family and I've been away from my computer.  So here you go...
Welcome to 3-D Thursday and this week we have a sweet gift treat for you that is perfect for batch making and features some brand new, upcoming products with a festive feel!  This week’s project was created by the fabulously talented Debbie Henderson over at Debbie's Designs and she came up with this fabulous project – further down this post you will find a link to the FREE Project Sheet that has step by step instructions & color photos so that you can create your own beautiful project.
And here it is!
 Such a cute way to wrap up a pack of gum isn't it?  I love those gift bows on top!  They are from the brand new set Bring on the Presents featured on pg 16 of the new Holiday Catalog which goes live for customer order on September 5th, and guess what – to make it easy to cut out those pretty bows, there are coordinating dies in All The Presents Thinlits Dies AND even better – they come in a BUNDLE to save you 10%!
The belly band and box are papers from Festive Farmhouse DSP that you can find on pg 13 of the Holiday Catalog and because they are double-sided, the inside looks pretty too!
Slide off that pretty bow adorned belly band and the paper unfolds to reveal the contents…a pack of gum!
You can get the stamp set and set of dies used on this project together as the Bring on the Presents Bundle to save you 10% which will be available for purchase on September 5th – here are the images included in this bundle:
This would make a great little gift for co-workers or teachers.  Are you ready to make some?  Just click on the link below to print off your FREE Project Sheet!  Happy crafting!


Thursday, August 16, 2018

3D Thursday - Mini Carry-All Bag

Hi there!  Welcome to 3D Thursday.  If you are visiting for the first time let me tell you a little bit about why Thursdays are special on my blog.  Every Thursday I post a 3D Project with a FREE Printable Project Sheet.  I am one of a group of four Stampin' Up! Demos that do this.  Each Thursday we take turns creating projects to share.  If there are five Thursdays we do a blog hop with four projects.  This week it's my turn to create a project for us all to share.  Let's take a look at it now.
It's a Mini Carry-All Bag made from our pretty Twinkle, Twinkle DSP.  Of course some Hershey Nuggets always makes for a great little added gift.
What a fun little way to give a gift to someone.  There is even room for a gift card to be tucked inside.  I've added three Hershey Nuggets, a little hand sanitizer and a pad of sticky notes to mine.
Here's a shot so you can look inside when empty.  You can even make your own paper shred to match your bag.  I used the 1 3/4" and 2 1/4" Circle punches to create my handles.  How I did it can be found in the Free Project Sheet at the end of my post.
I finished off my little bag by adding a sweet little tag.  I inked up the stamp set "A Big Thank You" and used it for my saying and flower.  Are you ready to make your own little bag?  Click on the link below to print off the FREE Project Sheet.  Have a crafty day!


Friday, August 10, 2018

Inky Friends Suite Designs Blog Hop

Hello! and welcome to the Inky Friends Suite Designs Blog Hop.  This hop features some of the Products that make up a collection of products featured in the new catalog.  There are 10 stops on this hop so please be sure and hop all the way around so you don't miss any of the wonderful projects we have for you.  If you have been following the hop in order then you have just arrived from Mary's Blog, where she featured the Broadway Bond.  She did a wonderful job, didn't she!  The Suite that I chose to work with was the Under The Mistletoe Suite.  Here we go!
I love, love, love the Designer Series Paper that is included in this Suite.  It's just traditional Christmas and the paper just makes me happy.
I had a lot of fun making this card using the Seasonal Wreath Embossing Folder, I embossed a wreath onto white cardstock then using a dauber and Old Olive Ink I colored the wreath.  I then fussy cut it out and using dimensionals popped it up on a piece of Whisper White CS that I had embossed with the Subtle Emboss Folder.  I dyed some regular Rhinestones using my Real Red Blendies and added them to the wreath. (Note - there are Red Rhinestones available with the suite but I didn't have them yet.)
My second project is a pretty simple card using one of the mistletoe stamps for my focal point and just adding layers of cardstock and DSP.  Very Simple card.
My last projects is this Origami Christmas Tree.  The tree stand 6" tall and is made from one piece of 12" x 12" DSP.  I made a lot of these fun trees last Christmas and can't wait to make them again with the new DSP in all sizes.  Thank you so much for stopping by to check out my projects for the hop.  now it's time to venture on to Mickey's Blog and see what she has come up with using the Suite called Tropical Escape.  I'm sure you will love her creations!  Happy crafting!
Twila


Thursday, August 9, 2018

3D Thursday - Concertina Card

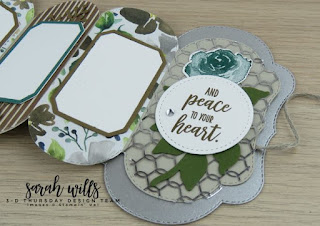
Good morning and welcome to another great FREE 3D Thursday Post.  This week the amazing and talented Sarah Wills has a beautiful accordion style card for us that you can add pictures or messages to.  As always with our 3D Thursday post you will find the directions and a list of everything you need to complete the project at the end of our post.  Let's get started!
Sarah's project is just lovely and would make a wonderful gift.  
You could make this into a mini photo album or add some inspirational thoughts for someone.
Sarah did such a beautiful job.
I love how each piece has angled corners.
So pretty.
and another view.  So if you are ready to make one of these little beauties then click on the link below for the FREE Project Sheet.  Happy Crafting!


Thursday, August 2, 2018

3D Thursday - Pretty Tissue Wrapper

Welcome to 3-D Thursday and this week we have a pretty way to cheer up a friend who is feeling down or poorly plus it’s also very practical…
This week’s project was created by the fabulously creative Jenn Gulch over at Twins & Twine and she came up with this cute project – further down this post you will find a link to the FREE Project Sheet that has step by step instructions & color photos so that you can create your own beautiful project.
And here is what Jenn came up with…a very pretty wrapper around an individual pack of tissues...
Now that would cheer me up for sure – those patterned papers are SO pretty and come from the Tea Room Specialty pack of Designer Series Papers – the pack of tissues just slides right in & out of either end of the wrapper.
Just look at all of these pretties…the base wrapper is Calypso Coral cardstock and the ribbons are from the Tea Room Ribbon Combo Pack…
Here’s a better look at some of those pretty papers that you get in Tea Room Specialty DSP…

Aren’t they gorgeous?  And I love the Pearlized Doily under the cup – what could be better for a tea themed project?!
The tea cups are stamped using a stamp from the set Time for Tea directly onto patterned papers and cut out with a coordinating die that you can find in Spot of Tea Framelits – this is a great way to get a really neat look without coloring plus it is much faster too!
And yup, you guessed it – that stamp set & the set of dies come together as a BUNDLE to save you 10%!  Find out more about that bundle in the FREE Project Sheet.
Wanna make some for your friends and family?  Ready to get crafty?  Well then, here you go!                              
Enjoy the FREE directions!


Wednesday, August 1, 2018

Pop-Up Birthday Cards For The Boys

These handsome boys are my triplet grandsons who turned six on Sunday.  We call them our little miracles.  They arrived 2 1/2 months early, weighing in at between 2 1/2 and 3 pounds,   I have been the babysitter for their mommy and daddy while they were working.  Although the last couple of years they got me some help so I could have a few days of every week.  Whew, and I needed it!  They will start all day school this year.  They are growing up so fast.  They are finally at the age where they appreciate the things that I make them and don't tear them up, so I made each of them a special pop-up card to go with their own Birthday Cake.
 This is Reid and his Mario Cake.  He was born first.
Here is his card open.  I love punch art!
and closed.
 This is Cade with his Ninja Turtle Cake.  I guess you would call him the middle child.
His Ninja card open.  Stampin' Ups new color Granny Apple Green is the perfect Turtle Color!
and shut.  The DSP I used for the background is our new 6" x 6" Designer Series Paper in the Brights Collection.
Jace with his Dirt Bike Cake.  Jace was the last born or the baby I guess you would say.  He's the tallest and eats the most.
Jace was very specific about what he wanted.  His motorcycle"Dirt Bike" was to be Red, with an Orange Flame on it and be popping a wheelie in the mud.
I really enjoyed making these fun cards for "The Boys".  One reason I hardly ever get rid of a Stampin' Up! Punch is because of all the fun punch art that can be made with them.
Thanks so much for dropping by.  Be sure and stop by tomorrow for a fun 3D Thursday Project with a FREE Project Sheet.
Have a crafty day!
Twila