Thursday, March 2, 2023

3D Thursday - Rain or Shine Peek-a-Boo Box

Welcome back! This week I have a super cute project for you created by teammate Darla Watson from over at Scrap Happen Here With Darla. First I want to say a huge Thank You! to Darla who came through for me this week as it was my turn to create a project but taking care of my mom didn't leave me any free time this week...Ok, so on to the adorable project that includes chocolate! Oh yes!


Darla created her adorable box using the Rain or Shine Designer Series Paper.


The sentiment was stamped in Memento Black and comes from the stamp set Easter Bunny.


Using the Stitched Shapes Dies, she cut a window for the little chocolate sheep to peak through. For the Free Instructions and a list of all the supplies needed click on the link below.


Crafty Hugs!
Twila Davis


Thursday, February 23, 2023

3D Thursday - Easter Cadbury Creame Egg Box


Happy Thursday, crafty friends! This week I have a super cute little Easter Box for you created by teammate Sarah Wills from over at Sarah's Ink Spot. This cute little box can hold a Cadbury Egg or othe Eater Treats. Change up the colors and pattern and can be a box for another occasion. Let's see her project!

This adorable little Bunny Box was crafted up using some products from our Occasions catalog and let me tell you a lot of the products are selling out fast!


With the lid off you can see one of the Cadbury eggs fits in it very nicely.


The bunny seems to be doing the Happy Spring Dance. You can't help but smile when you look at him. Sarah used the DSP Rain or Shine along with the matching dies, so you don't even have to stamp and color the bunny! The fun stamp set that was used called Conversation Bubbles also comes with matching dies. If you would like to recreate this adorable little Box just click on the link below for the FREE PDF!


Crafty Hugs!
Twila

Thursday, February 16, 2023

3D Thursday - Fold Flat Mini Treat Box


Welcome back everyone! Happy Thursday. I apologize for not posting the past few weeks and I'll try and play "catch up" at some point.  My mom has been in and out of the hospital since Dec 22 so things have been a bit crazy. But I've brought my laptop to the hospital with me today so I can post this week's super cute project that teammate Rick Adkins crafted up for us. For more of Rick's craftiness you can hop over to his blog and check it out Here. Rick crafted up a super cute little gift box so let's check it out.

This super cute little gift box was created using some of our new products. I love how bright and cheery it is.
So what supplies did Rick use to create his project? 
  • ●  Stamps: Charming Sentiments Stamp Set; In the Country Stamp Set

  • ●  Inks: Melon Mambo

  • ●  Cardstock: Melon Mambo; Mango Melody; Pool Party; Basic

    White

  • ●  Designer Paper: Brights Assortment Designer Series Paper

  • ●  Accessories: Rhinestone Basic Jewels

  • ●  Tools: Simply Scored Scoring Tool; Paper Trimmer; Paper Snips;

    Bone Folder; Layering Circles Dies; Charming Silhouettes Dies;

    1⁄2” circle punch (retired); corner rounder

  • ●  Miscellaneous: Multipurpose Liquid Glue; Stampin’

    Dimensionals; Mini Stampin’ Dimensionals 

For the FREE PDF jus click on the link below to print it off. Have a super crafty day my friends!


Crafty Hugs!
Twila

Thursday, January 26, 2023

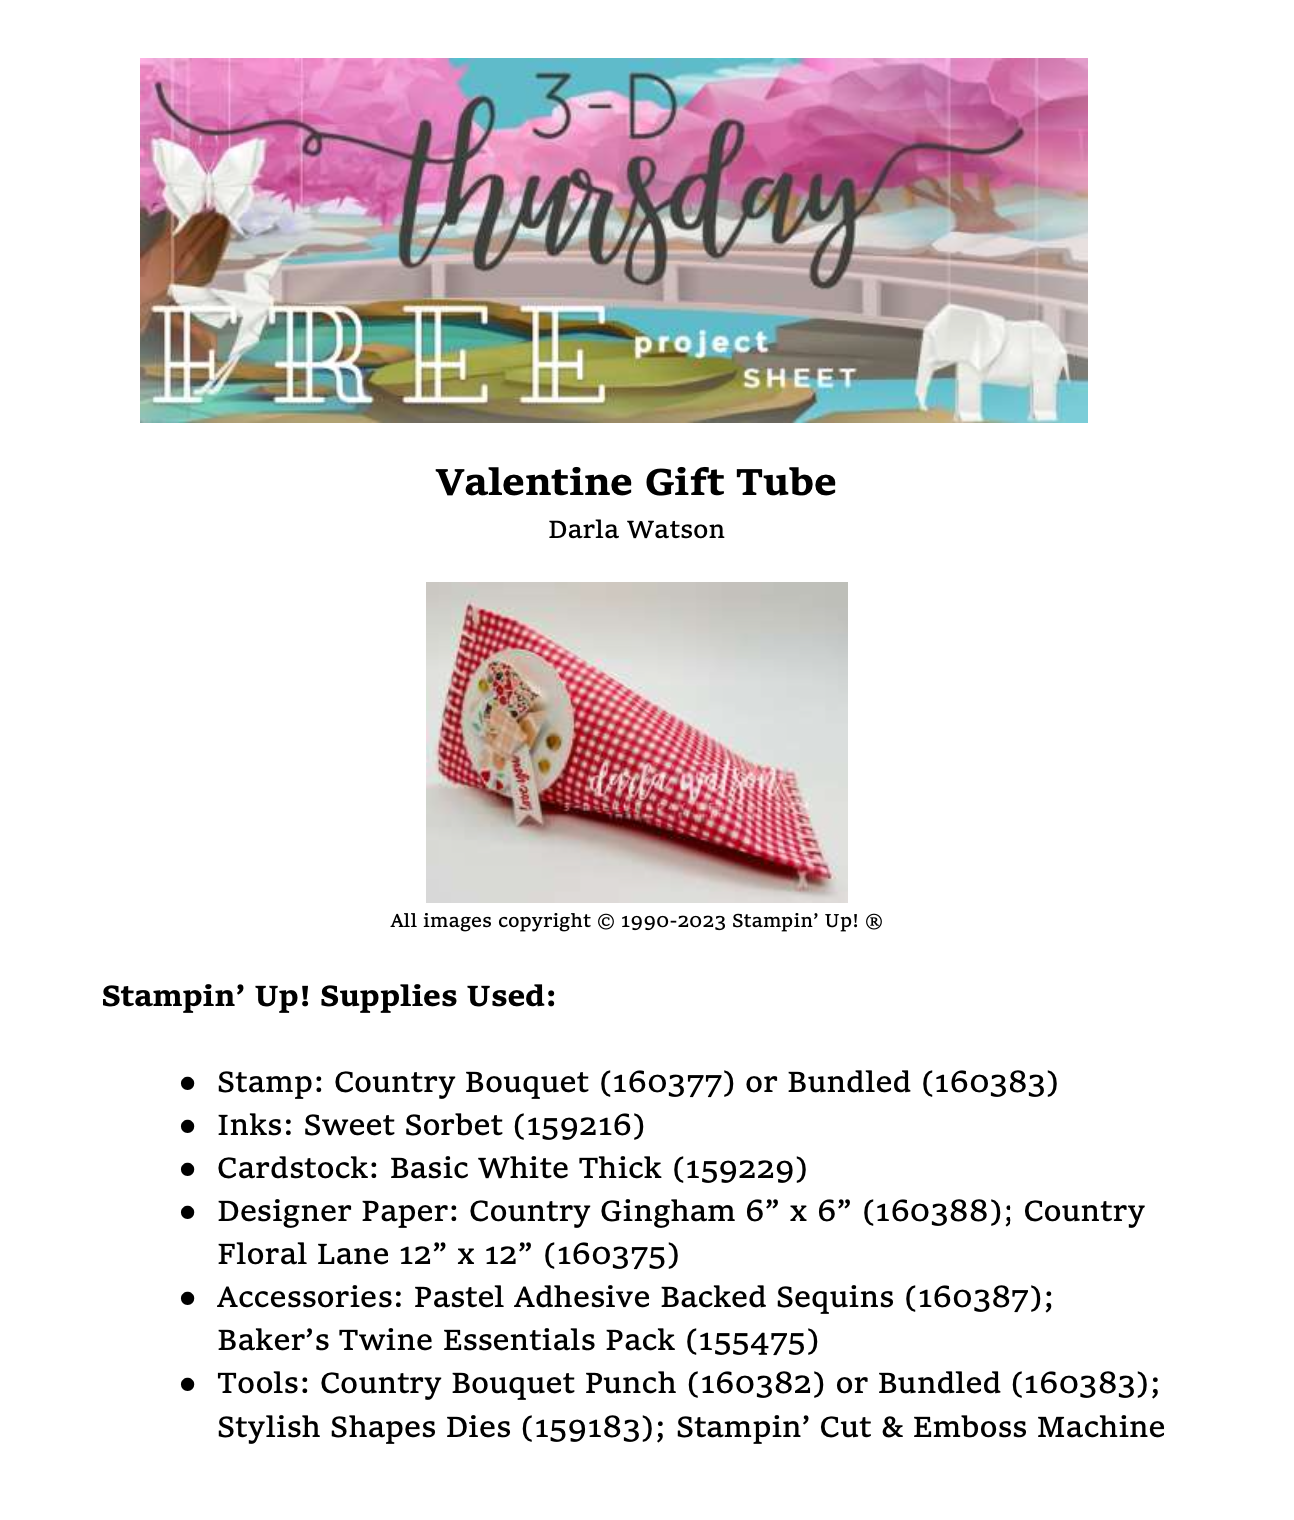
3D Thursday - Valentine Gift Tube


Hello, and Happy Thursday paper crafting peeps! This week teammate Darla Watson from over at Scraps Happen With Darla was at the designer's desk. Darla took and oldie but goodie treat holder and made it new again. This would make for a cute little gift for your kid's classmates or coworkers. Check it out and you will see how.


Darla created a Valentine Gift Tube or what I call a (Sour Cream Treat Holder) using a piece of the Country Gingham 6" x 6" DSP (160388). She also used the Country Bouquet Stamp Set and Matching Punch and the number for the bundle is (160383). So what twist did she put on it to make it new?


Darla used our piercing mat to punch holes at the ends and took a needle and twine to stitch the ends together. It adds such a super cute finishing touch to the project.


She filled it with Valentine M&M's before stitching the other end shut.


Here's how she decorated it up with all the fun little heart shapes and sequins. If you would like to recreate this project just click on the link below to print of the FREE PDF.


Happy Crafting!

Twila Davis

Thursday, January 19, 2023

3D Thursday - Paper Sack Gift Bag


Happy Thursday, paper crafting friends! This week I was at the designer's desk. I chose to bring back an oldie but goodie of an idea which involves a mini paper sack and also some white tissue paper. I gotta tell you a little story about the tissue paper. Almost 20 years ago when I was first introduced to Stamping' Up! I went to a couple of parties and I think my "I want to do this" moment was when my demonstrater pulled out some tissue paper and stamped on it. Oh my! It really lit me up and I became so excited about it. I know, it's the little things, right. Anyway this year in May will mark my 20 Anniversary with this company. I feel very blessed, as I have met a lot of wonderful people along the way, who have become good friends. Ok so enough of that. Let's check out my project!
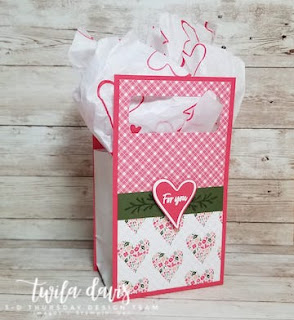

The project I crafted up for this week has a mini white paper sack for the base. I used the Country Bouquet Bundle (160383) and matching DSP Country Floral Lane (160375).  I also used the Vintage Bottle Punch to make my handle. It's always fun to find new ways to use our punches.


The back is just as pretty as the front.


Embossing is always fun and I wanted the heart outline and words to pop, so I heat embossed with our White Emboss Powder. I loved the results!


If you have never tried stamping on white tissue paper or other tissue paper I encourage you to do it.  It's instant gratification! For the FREE Project Sheet just click on the link below! And for all your crafty needs just hop over to my online store and shop your "heart" out.


Crafty Hugs!
Twila Davis

Thursday, January 12, 2023

3D Thursday - Sticky Note Holder With Calendar and Pen


Happy Thursday! This week teammate Sarah Wills from over at Sarah's Ink Spot was sitting at the creators desk. Sarah crafted up a cute little Sticky Note Holder with a matching pen. What a great little gift this would make.  Let's check it out!


Sarah created her project base from a 12" x 12" piece of our Basic White Cardstock. She added some of the new DSP from the Spring Occasions catalog called Flowers & More (160802) and also some Salebration Paper called Dandy Designs (160836).
 

Here's a front view.


And check this out, a mini RSVP pen!  What! I didn't even know they made these. It is so fun to be able to make a matching pen for your project.


One last look at Sarah's project. I hope you have enjoyed today's project and if you would like to recreate it just click on the link below to download the FREE Printable Project Sheet!
As always you can shop for all your craft supplies in my store by clicking the "Order Online" button to the left of this page.


Crafty Hugs to you!

Wednesday, January 11, 2023

Envelope Gift Pocket - Guest Tutorial Writer This Week At Splitcoaststampers

 Hello, Papercrafting Friends! This week I'm a guest designer over at Splitcoaststampers.com. I shared a fun and simply idea I came across on Pinterest using a business size envelope to create gift pockets. You can actually get two pockets out of one envelope and it is sooooo easy! 


Here's the two I did in the video and then another I made at Christmas time with my grandson, Cade.


You can find the Free PDF over at Splitcoaststampers.com. I'll add the link to the bottom of my post but for now please watch the video tutorial and tell me what you think. 

Envelope Gift Pocket

Crafty Hugs!

Twila Davis

Thursday, December 15, 2022

3D Thursday - Peace To You Candle


Hello crafty friends and Happy Thursday! This week teammate Watson from over at Scrap Happens Here with Darla was at the designer desk.  Darla crafted up a beautiful altered candle using the Peace To You stamp set.


It is actually a simple process that makes for a beautiful finished project. 


You will need a candle, a stamp, Basic White Cardstock,  Memento Black, wax paper, and a Heat Tool.


I think I like this one better without the saying. Simply beautiful. For the FREE PDF just click on the link below.  Oh, and today Only is FREE shipping on all orders of $75 or more. So check out all the great buys online from the Last Chance List and the Clearance Rack.


Thursday, December 8, 2022

3D Thursday - Christmas Shadow Box Card


Happy Thursday crafty friends! This week was my turn at the designer's desk.  I actually created this project for my Crafty Christmas Stamp Camp and thought others may enjoy it too. Let's check it out!


I created a beautiful little Nativity Shadow Box Card using the stamp set Peace To You.


I chose Night Of Navy and Basic White for my color pallet


From the top you can see that a tealight would easily fit inside. The card also lays flat and can fit inside a regular Stampin Up envelope.


On the back you can add a sentiment and your signature.


Here's a picture with a tealight lit up inside. If you would like to recreate this project just click on the link below to print off the Free PDF. 


And did you know the retiring list is out for the Holiday Mini? Also the Clearance Rack has been updated with lots of wonderful things! Click on the link below to shop from my online store.


Thanks for stopping by!
Crafty Hugs!
Twila